NES Controller – geek’s swiss army knife with ESP32 inside (ESP Thang)
Using the ESP32 one can do the usual stuff with this setup. These are known by its predecessor the ESP8266. With the Arduino core for the ESP32 all the good stuff like Analog/Digital IO, Wifi Client/AP Mode, HTTP Server, I2C, Serial/UART is available. For my first prototype I was using an Arduino Nano with 2 AAA batteries and a boostconverter. It was working quite good but tests with an ESP8266 showed that this was not enough power. So I found this quite old Samsung phone wich had a nice battery (Typ AB043446BE 3,7V). This was also suitable for the Sparkfun ESP32 Thing which features a LiPo charger. After throwing my first controller into the trash can, I was getting better. Using a Dremel to remove some of the plastic parts seemed a good idea.
")
ESP8266, Battery (Typ AB043446BE 3,7V)
Actually I was not quite satisfied with the result after making too much modifications on the plastic parts, soldering cables the worst possible way and gluing too much together. I needed a little break. After rethinking some of the option, optimising the way the microcontrollers can be arranged and fit into the small space I decided to give it a try with the Sparkfun ESP32. I found some thin cable on ebay and the wires that come with the chinese NES controller would do perfect.

Chinese NES controller
Stacking the ESP board on top of the controllers pad board gave me room for the ST7735 LCD and the small RFM69HW.

NES Controller Keypad PCB, Sparkfun ESP32
Sure I have seen better ways to solder things together, but this is not the goal of this project 😛
To get some more connectivity I pulled out the VCC, GND and I2C by using pin headers installed on the side. I2C sensors can now be used with the controller.

Sparkfun ESP32, AB043446BE 3,7V, ST7735 LCD
For the micro USB charging/programming I cut a little hole on the side. The final result looks like this.

Hooking up different I2C sensors to the ESP32 NES controller

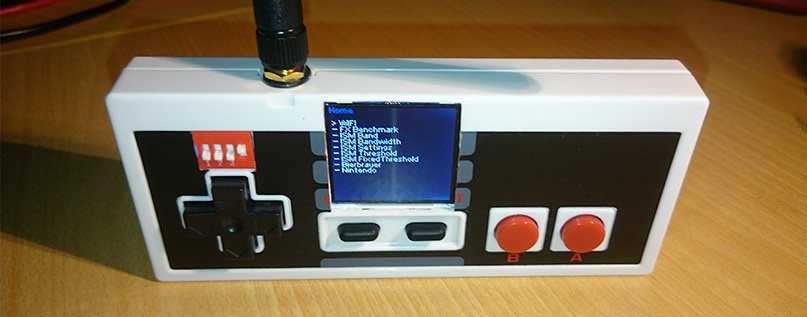
Current main menu of ESP32 NES controller
- Next stop TFT horizontal scrolling (rotated screen, maybe I need to implement that feature in the lib)
- Better menu structure with n submenus (I know there are several libs, but optimisation for this screen is needed)
- Support for Nordic Semiconductor nRF24L01 (2,4 GHz, MouseJack or other applications)
- Maybe support for the Texas Instruments CC1101 (433MHz / 868MHz / 915MHz)
- IR 😉
- WiFi Monitor mode / Deauth
4 Responses
Is the code posted somewhere?
The code is not fully optimised and needs refactoring. But at some point I will post it. Other than that, u can just go with the other resources I mentioned – on github.
I buy the service: How to integrate a driver in ESP32 and ESP8266 to work with nRF24L01?
I wish to get across my affection for your kindness supporting individuals who must have help on in this issue. Your very own commitment to getting the message along turned out to be unbelievably valuable and has in every case encouraged regular people just like me to reach their goals. Your entire important instruction signifies this much to me and far more to my fellow workers. Thanks a lot; from each one of us.